Project 5
Spring 2004
Due: May 4 @ 5 PM
10 points
This project involves implementing an ADT for a binary search tree.
#include <iostream>
#include <string>

using namespace std;

int main( int argc, char *argv[] )
{
  if ( argc != 2 ) {
    cout << argv[0] << " <filename> (e.g., '" << argv[0]
         << " tree.dta')" << endl;
    exit(0);
  } // if
  string filename(argv[1]);
  cout << "Filename: " << filename << endl;
  return 0;
} // main
cout << "Depth-first iterator: ";
DFIterator<int> dfiter ( tree.getRoot() );
cout << *dfiter;
while ( !dfiter.empty() ) {
  dfiter++;
  cout << *dfiter;
} // while
cout << endl;
This example will print the preorder traversal of the tree.
To implement the iterator classes, they must be a friend of the class implementing the safe pointer. For example, if DFIterator is the iterator class, and Position is the safe-pointer class, then you must use the following declaration:
...
using namespace std;

template <typename T> class DFIterator;

template <typename T>
class Position {

  friend class DFIterator<T>;

  public:
    Position();
...
You must provide a working UNIX Makefile with your submission. The one from Project 3 should work with minor changes.
For this project, do not worry about documenting. At this point, you get it if you're going to.
Instructions for Electronic Submission: At the top of the file main.cc (or the file containing the main function), place the following header comment, with the appropriate modifications:
//
// COSC 072 Project 5
// Name: <your name>
// ID: <GoCard ID>
// E-mail: <e-mail address>
// Instructor: Maloof
// TA: <TA's name>
//
// In accordance with the class policies and Georgetown's Honor Code,
// I certify that, with the exceptions of the class resources and those
// items noted below, I have neither given nor received any assistance
// on this project.
//
Although you may use any C++ compiler to develop your program, it must run under UNIX and must compile using GNU g++. You must also provide a working UNIX Makefile for your project.
If you need to include a message to your TA about your submission, then place the message in a file named README. Place the README file in the project directory p5/.
Before submitting, to reduce the size of the zip file, type 'make clean'.
To move up from the p5 directory, type
gusun% cd ..(Additional UNIX commands at the bottom of this page: HOWTO Compile under UNIX)
When you're ready to submit, change the name of the directory to your netid. For example, if your netid is maloofm, then rename the directory p5 by typing
gusun% mv p5 maloofmCreate a zip file of the directory and its contents by typing
gusun% zip -r p5.zip maloofm/*This command creates a zip file named p5.zip by recursively (-r) copying all of the files (*) from the directory maloofm/.
To submit the zip file type
gusun% submit -a p5 -f p5.zipp5 is the name of the assignment (-a) and p5.zip is the file (-f) to be submitted for that assignment.
If the program submits the file successfully, you will receive a receipt by e-mail at the address <netid>@georgetown.edu.
Submit your project only once.
Once you've submitted your project, it is important to keep an electronic copy on a university machine (e.g., gusun or cssun) that preserves the modification date and time. If we lose your project or the submission system breaks, then we will need to look at the modification date and time of your project to ensure that you submitted it before it was due.
You can also change the directory's name back to the original name. For example,
gusun% mv maloofm p5Note that changing the name of the directory does not change the dates of the files in the directory. You can also remove the zip file from your directory:
gusun% rm p5.zip
The TAs who will be grading your projects this semester are listed on the main page. You must submit your project before 5 PM on the due date.
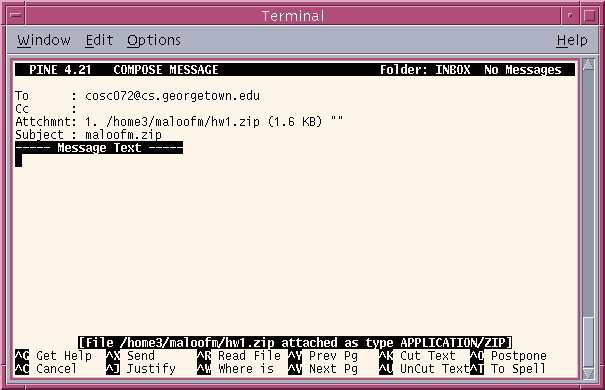
If you're running submit correctly and you see an error message labeled as SEVERE, then execute Plan B by using pine to submit your project as an attachment to an e-mail.
To accomplish this, at the gusun prompt, type 'pine'. When the menu appears, select the menu item for composing messages (C). In the To field, type the e-mail address cosc072maloof@cs. Attach your zip file. Control-T (symbolized ^T) will give you a list of files. Select the file to attach. The subject should be your netid followed by the extension .zip. For example, if your netid is maloofm, then the subject of the e-mail should be maloofm.zip. There's no need to include anything in the MESSAGE TEXT screen.
Once you've entered this information, the screen should look something like the following:
Finally, type ^X (Ctrl-X) to send the e-mail to the course account.