Project 3
Spring 2005
Due: Apr 8 @ 5 PM
8 points
This project involves implementing a List ADT using a doubly-linked list and a Vector ADT using a dynamically allocated C-style array. Senior software engineers often design classes and give them to junior programmers to implement and test. For this assignment, you will not only learn how to code List and Vector ADTs, but also you will get some experience coding someone else's specification.
gusun% cp ~maloofm/p3.tar.gz ./
gusun% gunzip p3.tar.gz
gusun% tar -xf p3.tar
In this archive, there should Makefile, Makefile.dep, main.cc, main.h, list.h, and vector.h.
Use stepwise refinement and incremental development. For example, implement and test the Node<T> class before implementing the List<T> class. Try to determine a dependency among the methods of, say, the List<T> class, and code the methods in the order of their dependence. Implement and test one method---even short ones---before attempting to implement the next. This should help you manage and reduce the number of compiler errors.
Instructions for Electronic Submission:
If you need to include a message to your TA about your submission, then place the message in a file named README. Place the README file in the p3 directory.
At the top of the file main.cc (or the file containing the main function), place the following header comment, with the appropriate modifications:
//
// COSC 072 Project 3
// Name: <your name>
// ID: <GoCard ID>
// E-mail: <e-mail address>
// Instructor: Maloof
// TA: <TA's name>
//
// In accordance with the class policies and Georgetown's Honor Code,
// I certify that, with the exceptions of the class resources and those
// items noted below, I have neither given nor received any assistance
// on this project.
//
Although you may use any C++ compiler to develop your program, it must run under UNIX and must compile using GNU g++. You must also provide a working UNIX Makefile for your project.
Before submitting, to reduce the size of the tar file, type 'make clean'.
To move up from the p3 directory, type
% cd ..(Additional UNIX commands at the bottom of this page: HOWTO Compile under UNIX)
When you're ready to submit, change the name of the directory to your netid. For example, if your netid is maloofm, then rename the directory p3 by typing
% mv p3 maloofmCreate a tar (tape archive) file of the directory and its contents by typing
% tar -cf p3.tar maloofmThis command creates a tar file named p3.tar containing the directory maloofm/ and the files therein.
Compress the tar file by typing:
% gzip p3.tarThis command will produce a file named p3.tar.gz, which is the gzipped tar file of the directory containing your project. Whew!
To submit the file, type
% submit -a p3 -f p3.tar.gzp3 is the name of the assignment (-a) and p3.tar.gz is the file (-f) to be submitted for that assignment.
If the program submits the file successfully, you will receive a receipt by e-mail at the address <netid>@georgetown.edu.
Submit your project only once.
Once you've submitted your project, it is important to keep an electronic copy on a university machine (e.g., gusun or cssun). System administrators routinely back up these machines.
You can also change the directory's name back to the original name. For example,
% mv maloofm p3You can also remove the tar file from your directory:
% rm p3.tar.gz
The TAs who will be grading your projects this semester are listed on the main page. You must submit your project before 5 PM on the due date.
If you're running submit correctly and you see an error message labeled as SEVERE, then execute Plan B by using pine to submit your project as an attachment to an e-mail.
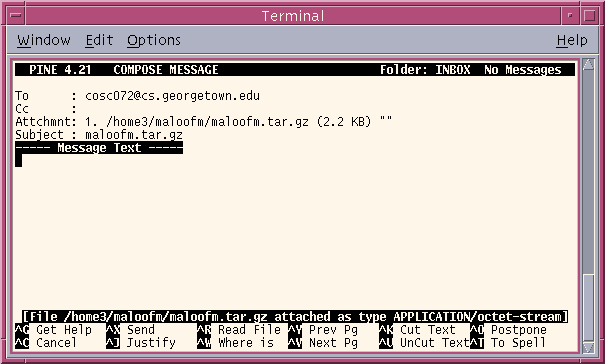
To accomplish this, at the gusun prompt, type 'pine'. When the menu appears, select the menu item for composing messages (C). In the To field, type the e-mail address cosc072maloof@cs. Attach your zip file. Control-T (symbolized ^T) will give you a list of files. Select the file to attach. The subject should be your netid followed by the extension .zip. For example, if your netid is maloofm, then the subject of the e-mail should be maloofm.zip. There's no need to include anything in the MESSAGE TEXT screen.
Once you've entered this information, the screen should look something like the following:
Finally, type ^X (Ctrl-X) to send the e-mail to the course account.